AmyStrange.org and the UNeXpLaiNed
©Copyrighted by Dave Ayotte & Caty Bergman
TOC (Table Of Contents)
    MAY-17-2013 [FRI]   18:41 PDT - AN INTRODUCTION TO INDOOR GARDENING:
                                    GROWING MARIJUANA (CANNABIS) INDOORS

        [ INTRODUCTION ]
        [ THE NEXT BIG STEP ]

            BOOK SOURCE

        [ A KINDA SHORT HISTORY OF POT ]
        [ SEEDS AND GERMINATION ]

            GERMINATION TIMETABLE

        [ WHERE TO GROW ]
        [ TRANSPLANTING ]
        [ TEMPERATURE ]
        [ NUTRITION ]

            NUTRIENT TABLE

        [ LIGHTING ]

            LIGHT SPECTRUM GRAPH
            CRI TABLE

        [ WATER ]


BLOG: MAY-17-2013 [FRI]   18:41 PDT                 Table Of Contents
AN INTRODUCTION TO INDOOR GARDENING:
GROWING MARIJUANA (CANNABIS) INDOORS
Dave has always enjoyed experimenting with plants. I love them too. A
house without plants should be a criminal offense, ha ha. Just
joking.
Dave though, like everything else he does, is taking this to a whole
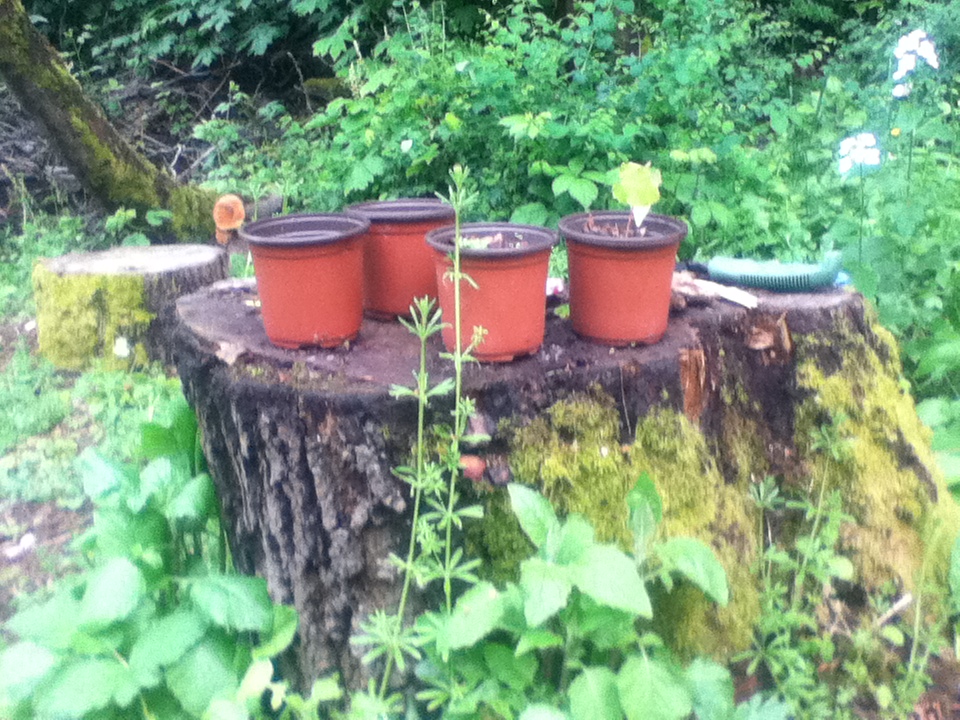
'nother level. For example where he lives, he's got a little tree
that he plucked from the ground and is now growing in a small pot on
top of a tree stump (SEE BELOW: the small pot on the very far
right). Am I the only one that sees the irony in this?
 He's also got a dandelion root immersed in a glass of water so he can
see just how exactly it grows back from just the root.
That experiment was actually pretty interesting. He still has it on his
back porch, and for a couple days at least, there were (I swear) a
hundred or more tiny-little spiders attached to the glass with a
kind of nest made of webbing, and every time the wind would blow
(even just a little), the itsy-bitsy spiders (sorry, I couldn't help
myself) would all move around together in a kind of swarm (like one
organism) while constantly rebuilding their nest as the wind blew it
(and them) around.
Hmmm, that reminds me of a discussion on swarms we had while writing
our UFO webpage last week, and how they might explain some UFO
sightings. Go HERE to read more about it.
He also gathered together some dandelion seeds, germinated them and
they are now growing in another small pot of dirt on the same tree
stump, right next to the potted tree I mentioned above. He was
curious to see just how dandelions grow those cool roots. Most
people I know hate dandelions, but Dave seems to be in love with
them.
He's weird, it's just as simple as that.
THE NEXT BIG STEP (Growing Pot)
Anyway, Dave now thinks he's ready for the next big step. He wants to
experiment with growing pot (marijuana, weed, bud, this bud's for
you, you know what I'm talking about) next. It's legal now where he
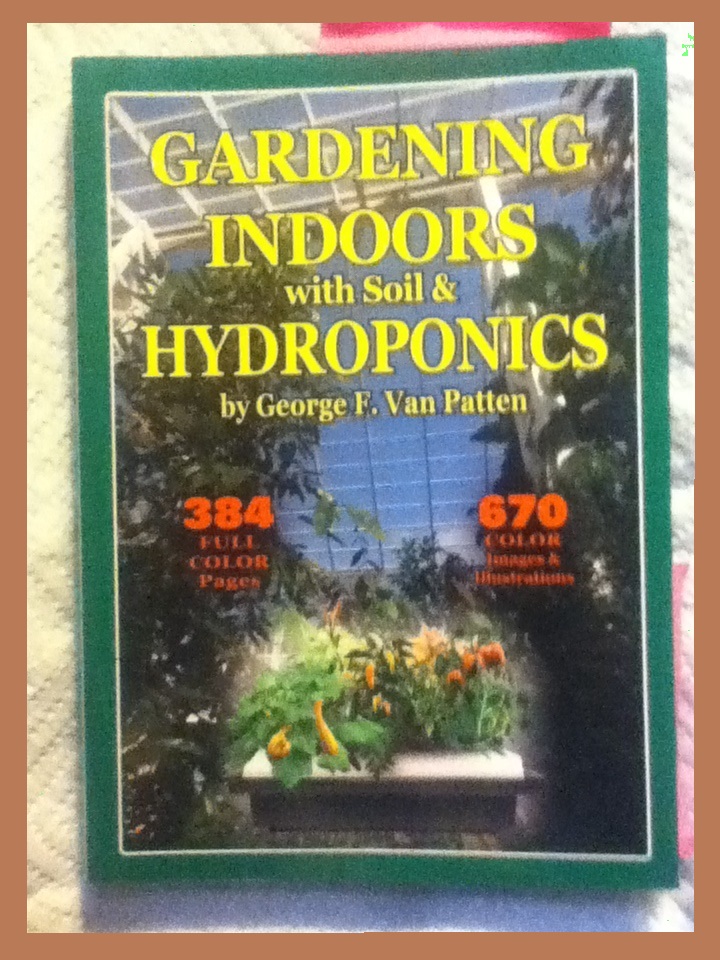
lives, so why not? He started off by getting the following book that
was recommended to him by a good friend of his:
BOOK SOURCE: "Gardening Indoors With Soil and Hydroponics"
by George F. Van Paten
He's also got a dandelion root immersed in a glass of water so he can
see just how exactly it grows back from just the root.
That experiment was actually pretty interesting. He still has it on his
back porch, and for a couple days at least, there were (I swear) a
hundred or more tiny-little spiders attached to the glass with a
kind of nest made of webbing, and every time the wind would blow
(even just a little), the itsy-bitsy spiders (sorry, I couldn't help
myself) would all move around together in a kind of swarm (like one
organism) while constantly rebuilding their nest as the wind blew it
(and them) around.
Hmmm, that reminds me of a discussion on swarms we had while writing
our UFO webpage last week, and how they might explain some UFO
sightings. Go HERE to read more about it.
He also gathered together some dandelion seeds, germinated them and
they are now growing in another small pot of dirt on the same tree
stump, right next to the potted tree I mentioned above. He was
curious to see just how dandelions grow those cool roots. Most
people I know hate dandelions, but Dave seems to be in love with
them.
He's weird, it's just as simple as that.
THE NEXT BIG STEP (Growing Pot)
Anyway, Dave now thinks he's ready for the next big step. He wants to
experiment with growing pot (marijuana, weed, bud, this bud's for
you, you know what I'm talking about) next. It's legal now where he
lives, so why not? He started off by getting the following book that
was recommended to him by a good friend of his:
BOOK SOURCE: "Gardening Indoors With Soil and Hydroponics"
by George F. Van Paten
 The book has loads and loads of pictures and illustrations, but (no
matter how many books you read or pictures you look at) there's no
better way to learn than by getting your hands dirty and actually
doing it yourself. You can memorize all kinds of information, but
the real understanding comes from actually doing what you learn.
While we were looking the above book up on Amazon.com, we also noticed
some other interesting books. One of them was called "Aquaponic
Gardening: A Step-By-Step Guide to Raising Vegetables and Fish
Together" by Sylvia Bernstein. Like the title says, Aquaponics
is growing fish and plants together, using the fish poo as the
nutrient base for growing plants in water, rather than soil. I
didn't really get too much into it, but it was an interesting idea
none the less, and I'll have to remember to read more about this
later. One thing I'd like to find out is if the fish have to be
separated from the plants for this to work?
The book by Van Paten, although it did have one solid chapter on
hydroponics, was mostly aimed at growing plants indoors in soil
with loads of information about temperature, nutrients and lighting.
Soil based seems to be the way Dave wants to go anyway, and besides,
from what I can see, hydroponics involves monitoring the chemical
levels of the water the plants are growing in and making sure it
stays within a certain balance. Seems like a lot of hard work, but
maybe that's just me. Dave wants to do the aquaponic thing anyway,
with at least one plant, for research purposes. Using fish poo to
grow pot. I'd pay a buck to see that, ha ha.
Dave just wants to smoke it. Research, he keeps telling me. Whatever.
BACK TO THE BOOK
Anyway, back to the book and learning the basics of indoor gardening.
Indoor gardening is basicly using science to bringing outdoor plants
and growing them indoors.
The two types of outside plants that are most often grown indoors,
besides weed (marijuana), are vegetables (which include spices) and
flowers. I think both have their own individual preparations and
rules for nutrition and lighting.
Dave made the decision that marijuana should be grown using the
preparation and rules that involve flowering plants, although
most plants (excepting algae, ferns, some vines and ivys, and
other's I can't remember off the top of my head), produce flowers;
the flower on marijuana is the reason the plant produces THC
(TetraHydroCannabinol), and thus the reasoning why Dave thinks we
should defer to the flowering rules over all else.
Make's sense to me. We'll read more and find out for sure...
What Dave found out was that there are mainly two stages of marijuana
growth, the vegetative stage (which is mostly the life of the plant
until it begins flowering) and of course the flowering stage. This
is where you do all the "Sensimilla" whodoo.
The book has loads and loads of pictures and illustrations, but (no
matter how many books you read or pictures you look at) there's no
better way to learn than by getting your hands dirty and actually
doing it yourself. You can memorize all kinds of information, but
the real understanding comes from actually doing what you learn.
While we were looking the above book up on Amazon.com, we also noticed
some other interesting books. One of them was called "Aquaponic
Gardening: A Step-By-Step Guide to Raising Vegetables and Fish
Together" by Sylvia Bernstein. Like the title says, Aquaponics
is growing fish and plants together, using the fish poo as the
nutrient base for growing plants in water, rather than soil. I
didn't really get too much into it, but it was an interesting idea
none the less, and I'll have to remember to read more about this
later. One thing I'd like to find out is if the fish have to be
separated from the plants for this to work?
The book by Van Paten, although it did have one solid chapter on
hydroponics, was mostly aimed at growing plants indoors in soil
with loads of information about temperature, nutrients and lighting.
Soil based seems to be the way Dave wants to go anyway, and besides,
from what I can see, hydroponics involves monitoring the chemical
levels of the water the plants are growing in and making sure it
stays within a certain balance. Seems like a lot of hard work, but
maybe that's just me. Dave wants to do the aquaponic thing anyway,
with at least one plant, for research purposes. Using fish poo to
grow pot. I'd pay a buck to see that, ha ha.
Dave just wants to smoke it. Research, he keeps telling me. Whatever.
BACK TO THE BOOK
Anyway, back to the book and learning the basics of indoor gardening.
Indoor gardening is basicly using science to bringing outdoor plants
and growing them indoors.
The two types of outside plants that are most often grown indoors,
besides weed (marijuana), are vegetables (which include spices) and
flowers. I think both have their own individual preparations and
rules for nutrition and lighting.
Dave made the decision that marijuana should be grown using the
preparation and rules that involve flowering plants, although
most plants (excepting algae, ferns, some vines and ivys, and
other's I can't remember off the top of my head), produce flowers;
the flower on marijuana is the reason the plant produces THC
(TetraHydroCannabinol), and thus the reasoning why Dave thinks we
should defer to the flowering rules over all else.
Make's sense to me. We'll read more and find out for sure...
What Dave found out was that there are mainly two stages of marijuana
growth, the vegetative stage (which is mostly the life of the plant
until it begins flowering) and of course the flowering stage. This
is where you do all the "Sensimilla" whodoo.
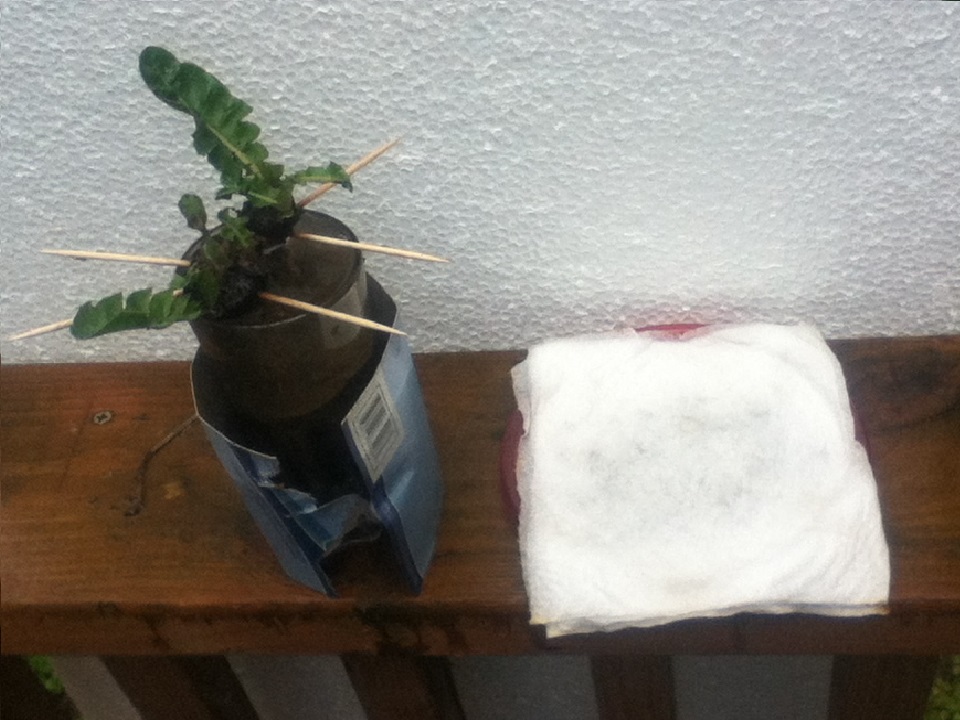 In the picture on the left
is the infamous dandelion
root I mentioned earlier.
And to the right of that,
you should be able to see
a round red-rubber top
that Dave is using as
a dish to hold a bunch of
germinating Pussy Willow
seeds (using the paper
towel pre-soaking method,
his favorite). The little
spider swarm was hanging
from the toothpicks like a
curtain.
A KINDA SHORT HISTORY OF POT
The first thing on the agenda was getting seeds for germination. I won't
bore you with the details, but the best seeds to get if you are buying
them is from a retailer that sells them with "All-Ammerican Selection"
(AAS) somewhere on the label. They are suppose to grow better
than other brands. Dave nor I know if this is true or not. Sounds
pretty official though, although it makes me wonder just how you get
a hold of some pot seeds to grow, no way can I believe that any
company that sells seeds with an AAS label would be involved in
marijuana seeds, at least not yet anyway.
I mean, I know one way to get them. Buy some pot and use those seeds.
That is way easier to say than to actually do, I know that much
anyway. Dave tells me that back in the day (pre 1970-80s) marijuana
(also spelled marihuana) mostly came from Mexico. It cost ten
dollars for a lid (ounce) and was loaded with seeds and stems.
You could get other kinds like Columbian and Thia Stick, but they cost
more. Forty dollars for an ounce of Columbian, and Dave doesn't
remember how much Thia went for because he never had the opportunity
to buy it (although he has smoked it), but he does know that it was
sold by the gram rather than by the ounce (28.34 grams to an ounce)
and it was at least ten dollars a gram. There's hash also, but trust
me, you can't get seeds from hash.
In the early 70s, Nixon declared a "War on Drugs" and marijuana was
immediately placed on a list (along with heroin) as a schedule one
drug, which meant it had no medicinal value what so ever.
Then in the late 70s, the way Dave explains it, some pretty big busts
occurred all around the United States, which was immediately
followed by a marijuana drought. For almost six months (if not
longer), nothing.
Then, a small trickle appeared, but at a price. It cost forty dollars
for a lid (ounce). The good news was that it wasn't from Mexico. It
was a new and different kind of pot, or so Dave remember's people
saying at the time. It was called "Sensimilla", which is from the
Spanish "sin semilla" (this is the correct spelling) which means
"without seed," and ever since then it hasn't been easy getting
marijuana seeds.
It cost more for Sensimilla, but it was worth it according to Dave. It
gave you a nice buzz, also according to Dave. It WAS way better than
Mexican Pot, somewhere between Columbian and Thai. And every year
the stuff kept getting better, but also began to cost more and more.
Today, I think it's sold by the eighth (1/8 of an ounce, around 3 to
4 grams) and cost about forty dollars, or so I'm told.
Dave just made a possible connection between the time Sensimilla began
hitting the streets and the end of the Vietnam War. Maybe some of
our guys learned a few "Sensimilla tricks" while they were over
there. It's an interesting hypothesis and quite probable, in my
opinion. I'm sure someone must have written about this before us.
Anyway, from then on, pot from Mexico (known as Mexican Pot) became a
kind of code word (or slang) for bad (shitty) pot. Still is, as far
as I know, although Dave admits it (the original mexican pot) wasn't
as bad as people are making it out to be today.
Sensimilla (Dave likes this spelling better than the correct one) was
produced primarily by making the plant think it was time to produce
flowers (and as a result more THC) by cutting the amount of light
the plant receives (this obviously mostly only works in an indoor
growing environment) from 16 hours to 12 or less hours after it has
had at least two months to grow. After two or three weeks, the light
is again raised to 16 hours for another two or three weeks, then
back again to 12 or less, on and on for as long as you desire
(usually two or more times, up to six or even more if you want).
Each time the light is reduced, more THC is produced, and more
flowers I would guess also, but I'm not sure about that part.
The tricky part is to separate the female plants from the male plants
so seeds aren't produced. Dave likes to call this the sensimilla
trick, but the really tricky part is that the female plant, if there
are no males around, will produce their own male parts so they can
fertilize themselves, and you have to constantly look for and remove
that part so it can't fertilize itself as a result. Kind of cruel in
a way which got us discussing plants and can they feel emotion or
pain. Dave thinks they do, maybe not emotion but definitely pain;
while I just hope they don't, because if they do, fire seems to be
their biggest enemy, and I don't even want to think about THAT
reality, although we did discuss that a little. I'll have to
reproduce this discussion in another blog entry later. It was a
pretty interesting discussion none the less, in my opinion.
So in conclusion, that's kind of why it's not as easy to get seeds
today as it was in "the day," according to Dave anyway.
Dave just found this webpage on Wikipedia:
http://en.wikipedia.org/wiki/Cannabis_cultivation
He's going to read that while I read more from our book source.
UPDATE: Dave checked out a couple places online to get a feel
for the prices. Ten dollars for one guaranteed female seed is not
unheard of from what Dave has seen so far. We'll keep you updated.
SEEDS AND GERMINATION
In the picture on the left
is the infamous dandelion
root I mentioned earlier.
And to the right of that,
you should be able to see
a round red-rubber top
that Dave is using as
a dish to hold a bunch of
germinating Pussy Willow
seeds (using the paper
towel pre-soaking method,
his favorite). The little
spider swarm was hanging
from the toothpicks like a
curtain.
A KINDA SHORT HISTORY OF POT
The first thing on the agenda was getting seeds for germination. I won't
bore you with the details, but the best seeds to get if you are buying
them is from a retailer that sells them with "All-Ammerican Selection"
(AAS) somewhere on the label. They are suppose to grow better
than other brands. Dave nor I know if this is true or not. Sounds
pretty official though, although it makes me wonder just how you get
a hold of some pot seeds to grow, no way can I believe that any
company that sells seeds with an AAS label would be involved in
marijuana seeds, at least not yet anyway.
I mean, I know one way to get them. Buy some pot and use those seeds.
That is way easier to say than to actually do, I know that much
anyway. Dave tells me that back in the day (pre 1970-80s) marijuana
(also spelled marihuana) mostly came from Mexico. It cost ten
dollars for a lid (ounce) and was loaded with seeds and stems.
You could get other kinds like Columbian and Thia Stick, but they cost
more. Forty dollars for an ounce of Columbian, and Dave doesn't
remember how much Thia went for because he never had the opportunity
to buy it (although he has smoked it), but he does know that it was
sold by the gram rather than by the ounce (28.34 grams to an ounce)
and it was at least ten dollars a gram. There's hash also, but trust
me, you can't get seeds from hash.
In the early 70s, Nixon declared a "War on Drugs" and marijuana was
immediately placed on a list (along with heroin) as a schedule one
drug, which meant it had no medicinal value what so ever.
Then in the late 70s, the way Dave explains it, some pretty big busts
occurred all around the United States, which was immediately
followed by a marijuana drought. For almost six months (if not
longer), nothing.
Then, a small trickle appeared, but at a price. It cost forty dollars
for a lid (ounce). The good news was that it wasn't from Mexico. It
was a new and different kind of pot, or so Dave remember's people
saying at the time. It was called "Sensimilla", which is from the
Spanish "sin semilla" (this is the correct spelling) which means
"without seed," and ever since then it hasn't been easy getting
marijuana seeds.
It cost more for Sensimilla, but it was worth it according to Dave. It
gave you a nice buzz, also according to Dave. It WAS way better than
Mexican Pot, somewhere between Columbian and Thai. And every year
the stuff kept getting better, but also began to cost more and more.
Today, I think it's sold by the eighth (1/8 of an ounce, around 3 to
4 grams) and cost about forty dollars, or so I'm told.
Dave just made a possible connection between the time Sensimilla began
hitting the streets and the end of the Vietnam War. Maybe some of
our guys learned a few "Sensimilla tricks" while they were over
there. It's an interesting hypothesis and quite probable, in my
opinion. I'm sure someone must have written about this before us.
Anyway, from then on, pot from Mexico (known as Mexican Pot) became a
kind of code word (or slang) for bad (shitty) pot. Still is, as far
as I know, although Dave admits it (the original mexican pot) wasn't
as bad as people are making it out to be today.
Sensimilla (Dave likes this spelling better than the correct one) was
produced primarily by making the plant think it was time to produce
flowers (and as a result more THC) by cutting the amount of light
the plant receives (this obviously mostly only works in an indoor
growing environment) from 16 hours to 12 or less hours after it has
had at least two months to grow. After two or three weeks, the light
is again raised to 16 hours for another two or three weeks, then
back again to 12 or less, on and on for as long as you desire
(usually two or more times, up to six or even more if you want).
Each time the light is reduced, more THC is produced, and more
flowers I would guess also, but I'm not sure about that part.
The tricky part is to separate the female plants from the male plants
so seeds aren't produced. Dave likes to call this the sensimilla
trick, but the really tricky part is that the female plant, if there
are no males around, will produce their own male parts so they can
fertilize themselves, and you have to constantly look for and remove
that part so it can't fertilize itself as a result. Kind of cruel in
a way which got us discussing plants and can they feel emotion or
pain. Dave thinks they do, maybe not emotion but definitely pain;
while I just hope they don't, because if they do, fire seems to be
their biggest enemy, and I don't even want to think about THAT
reality, although we did discuss that a little. I'll have to
reproduce this discussion in another blog entry later. It was a
pretty interesting discussion none the less, in my opinion.
So in conclusion, that's kind of why it's not as easy to get seeds
today as it was in "the day," according to Dave anyway.
Dave just found this webpage on Wikipedia:
http://en.wikipedia.org/wiki/Cannabis_cultivation
He's going to read that while I read more from our book source.
UPDATE: Dave checked out a couple places online to get a feel
for the prices. Ten dollars for one guaranteed female seed is not
unheard of from what Dave has seen so far. We'll keep you updated.
SEEDS AND GERMINATION
 GERMINATION is the name of the process the seed goes through once it's
triggered to start growing. The timetable below was the first thing
I came across when I started reading our book source. In a second,
we'll explain how to set up seeds so they are triggered to begin
growing (germinating):
GERMINATION TIMETABLE
=======================
The First 55-72 HOURS:
-----------------------------
By the end of 72 hours (3 days), the SEED
should already have absorbed the water around
it, and this along with a warm environment
and plenty of air, THIS SHOULD HAVE TRIGGERED
THE ROOT TIP TO BEGIN GROWING AND BECOME
VISIBLE FROM OUTSIDE THE SEED COVERING.
10-14 DAYS:
-----------------------------
By the end of fourteen days (2 weeks), THE
FIRST ROOTS SHOULD BE EASY TO SEE GROWING
OUTSIDE THE SEED, reaching out and down
for something on which to anchor the rest
of the plant.
At 21-30 DAYS:
-----------------------------
The SEED should be ROOTED by now, and YOU
SHOULD BE ABLE TO SEE TWO LEAVES BEGINNING TO
FORM.
Before we get into discussing getting set up for germination, let's go
over some of the scientific terms used for parts of the germinating
seed, and then some scientific names for marijuana (cannabis)
itself, but first a word from our sponsor (Dave).
GERMINATION is the name of the process the seed goes through once it's
triggered to start growing. The timetable below was the first thing
I came across when I started reading our book source. In a second,
we'll explain how to set up seeds so they are triggered to begin
growing (germinating):
GERMINATION TIMETABLE
=======================
The First 55-72 HOURS:
-----------------------------
By the end of 72 hours (3 days), the SEED
should already have absorbed the water around
it, and this along with a warm environment
and plenty of air, THIS SHOULD HAVE TRIGGERED
THE ROOT TIP TO BEGIN GROWING AND BECOME
VISIBLE FROM OUTSIDE THE SEED COVERING.
10-14 DAYS:
-----------------------------
By the end of fourteen days (2 weeks), THE
FIRST ROOTS SHOULD BE EASY TO SEE GROWING
OUTSIDE THE SEED, reaching out and down
for something on which to anchor the rest
of the plant.
At 21-30 DAYS:
-----------------------------
The SEED should be ROOTED by now, and YOU
SHOULD BE ABLE TO SEE TWO LEAVES BEGINNING TO
FORM.
Before we get into discussing getting set up for germination, let's go
over some of the scientific terms used for parts of the germinating
seed, and then some scientific names for marijuana (cannabis)
itself, but first a word from our sponsor (Dave).
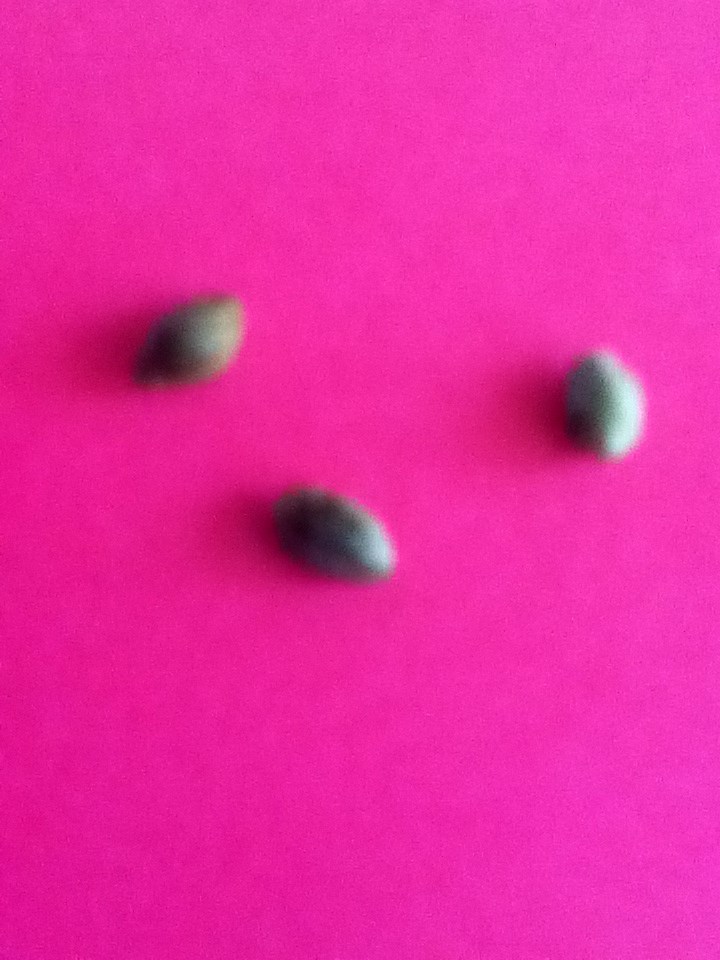 Dave has found three seeds that look healthy
enough to germinate, and as soon as we finish
our research, he is going to try and start
them. His first objective (hoping that at least
one of the seeds that germinate is a female) is
to get more seeds. We'll keep you udpated,
hopefully (we're crossing our fingers), when we
write the second part of this Blog entry next
month or maybe not until the month after that.
SCIENTIFIC TERMS
Those first leaves (also known as the seed leaves or embryonic leaves)
that are the first to appear from inside the seed, if you want to
get all sciency about it (and who doesn't, ha ha), are known as the
cotyledon ("seed leaves"). Also, the (embryonic) root tip, mentioned
above, is called the radical, and the part between the leaves and
root is called the hypocotyl (or the "hypocotyledonous stem", which
means, "below seed leaf").
While we're on the subject of scientific terms, Dave found these on the
webpage he was reading:
SOURCE: http://en.wikipedia.org/wiki/Cannabis_cultivation
Dave has found three seeds that look healthy
enough to germinate, and as soon as we finish
our research, he is going to try and start
them. His first objective (hoping that at least
one of the seeds that germinate is a female) is
to get more seeds. We'll keep you udpated,
hopefully (we're crossing our fingers), when we
write the second part of this Blog entry next
month or maybe not until the month after that.
SCIENTIFIC TERMS
Those first leaves (also known as the seed leaves or embryonic leaves)
that are the first to appear from inside the seed, if you want to
get all sciency about it (and who doesn't, ha ha), are known as the
cotyledon ("seed leaves"). Also, the (embryonic) root tip, mentioned
above, is called the radical, and the part between the leaves and
root is called the hypocotyl (or the "hypocotyledonous stem", which
means, "below seed leaf").
While we're on the subject of scientific terms, Dave found these on the
webpage he was reading:
SOURCE: http://en.wikipedia.org/wiki/Cannabis_cultivation
"Cannabis belongs to the genus Cannabis in the family Cannabaceae
and includes four species, C. sativa, C. indica, C. afghanica, and
C. ruderalis (APG II system). It is typically a dioecious (each
individual is either male or female) annual plant (life period:
April�September)... "
GERMINATION
To trigger the germination process, SEEDS NEED FOUR THINGS, (1) to be
warm, (2) wet, (3) oxygen/ CO2), and (4) a relatively dark place to
grow. There are two popular ways to meet these four needs, at least
according to our book source above.
TO START GERMINATING
SEEDS NEED FOUR THINGS
========================
1 Heat (1)
2 Water (2)
3 OXYGEN/ CO2 (3)
4 DARKNESS (4)
The first way (method) is called "direct seed" and the second is called
"pre-soaking in water". Dave has almost always used the "pre-soaking
method," and so have I, mostly anyway, when I've done it. Although,
I've also just put seeds in good dirt and watered them, hoping
they'll grow and most of the time they do. Although Dave has also
planted seeds directly in soil also, he likes the pre-soak method
that he uses because he likes to see the seeds start. I have to
agree so that's the method we'll discuss in more detail below, after
a short discussion about the "direct seed" method mentioned above.
DIRECT SEED
From what I gather direct seed seems to mean what I wrote about doing
earlier and that is to plant the seeds directly into the soil
without any transplanting involved at all. Here's an interesting
website we found about direct seeding from about.com:
http://gardening.about.com/od/seedstarting/f/What-Is-Direct-Seeding-Or-Direct-Sowing.htm
The only real difference between direct seed and pre-soaking was that
with pre-soaking you start the seeds outside the soil, and after
they start germinating, transplant them into their permanent homes.
Obviously when you direct seed, you still have to meet the four
needs mentioned above.
You shouldn't plant your seeds before the last frost (1), nor should
you plant them deeper than twice their length, and also be sure
the seeds are watered very well (2) the first time around and
regularily after that. And unless you are planting them outside
in some kind of weird vacuum, there will be plenty of oxygen/ CO2
(3) for when the seeds need it, which is usually after the first 24
hours after being watered. Being in the soil takes care of them
being in the dark (4).
Another thing to keep in mind when planting seeds directly into the
soil is to space them so each individual plant has enough room for
the roots and leaves to grow and also so they don't have to fight
each other for sunlight.
After about a week, according to the germination table above, you
should start seeing the seedlings begin to poke their tiny little
leaves (cotyledon) through the soil. Success!
PERSONAL KNOWLEDGE
Please, go to the above webpage and check it out for yourself. Never
take our word for anything, if you have any doubts, always do your
own research to make sure we're not just snowing you. But, after
everything is all said and done, personal knowledge really IS an
awesome tool. You can either memorize things that other people tell
you are facts, or you can get your hands dirty and find out for
yourself what the real facts are or maybe find out those memorized
facts are really nly just another person's opinion masquerading as
a fact. Personal knowledge is a good thing, and fun too.
PRE-SOAKING
Anyway, to start the pre-soaking method, you can either first find a
warm (1) and dark place (4) to put the seeds in a glass or other
container of water (2) and let them sit there for NO MORE THAN 24
HOURS. THIS IS VERY IMPORTANT, because the seeds WILL LITERALLY
DROWN at this stage if they can't get oxygen/ CO2 (3) for longer
than 24 hours; or, you can skip that step all together and place
them directly between two paper towel sheets or two pieces of cheese
cloth and soak the sheets thoroughly (2), as we will explain further
in the next paragraph.
After you've soaked the seeds in a warm (1) dark place (4) for 24
hours (2), if they already aren't there, place them between two
paper towel sheets (or two sheets of cheesecloth) in a dish of some
kind. Now wet the paper towels, draining any excess water for the
same reasons mentioned above about the seeds literally drowning due
to lack of oxygen (3). Now place these seeds in a warm dark place
and wait 72 hours, wetting the paper towels or cheesecloth once a
day, remembering to also drain them of any excess water after
wetting.
AFTER THREE DAYS, we should be able to see the root beginning
to grow. After the root tip (radical) emerges and begins to grow
outside the seed covering, is the best time to transplant them to a
more permanent home.
 Above is a picture of some pussy willow seeds (it's not a good picture)
that Dave gathered together earlier in the week. At least he thinks
they're pussy willow seeds anyway. I have no idea what they are.
All last week where Dave lives, a whole shit-load of tiny little seeds,
covered with some kind of cottony-like substance, were floating all
over the place. He knows that they're not dandelion seeds, because
he's already started germinating some of them and these are not the
same at all. Dandelion seeds float around in a kind of round
parachute kind of thingy, while these seeds were kind of in the
middle of some cottony stuff, not hanging from their parachutes like
dandelion seeds do. So, definitely not dandelion seeds, Dave
has concluded. I'll give him the benefit of the doubt on this one,
subject to verification of course.
While they were floating around, He grabbed as many of them as he
could, and using the paper towel pre-soaking method, he tried
getting some of them to maybe germinate. In the picture above, the
seeds have been germinating for 96 hours (4 days). He also added a
little dirt with the seeds, just in case. If you look closely, you
can maybe see that some of them have actually germinated.
Above is a picture of some pussy willow seeds (it's not a good picture)
that Dave gathered together earlier in the week. At least he thinks
they're pussy willow seeds anyway. I have no idea what they are.
All last week where Dave lives, a whole shit-load of tiny little seeds,
covered with some kind of cottony-like substance, were floating all
over the place. He knows that they're not dandelion seeds, because
he's already started germinating some of them and these are not the
same at all. Dandelion seeds float around in a kind of round
parachute kind of thingy, while these seeds were kind of in the
middle of some cottony stuff, not hanging from their parachutes like
dandelion seeds do. So, definitely not dandelion seeds, Dave
has concluded. I'll give him the benefit of the doubt on this one,
subject to verification of course.
While they were floating around, He grabbed as many of them as he
could, and using the paper towel pre-soaking method, he tried
getting some of them to maybe germinate. In the picture above, the
seeds have been germinating for 96 hours (4 days). He also added a
little dirt with the seeds, just in case. If you look closely, you
can maybe see that some of them have actually germinated.
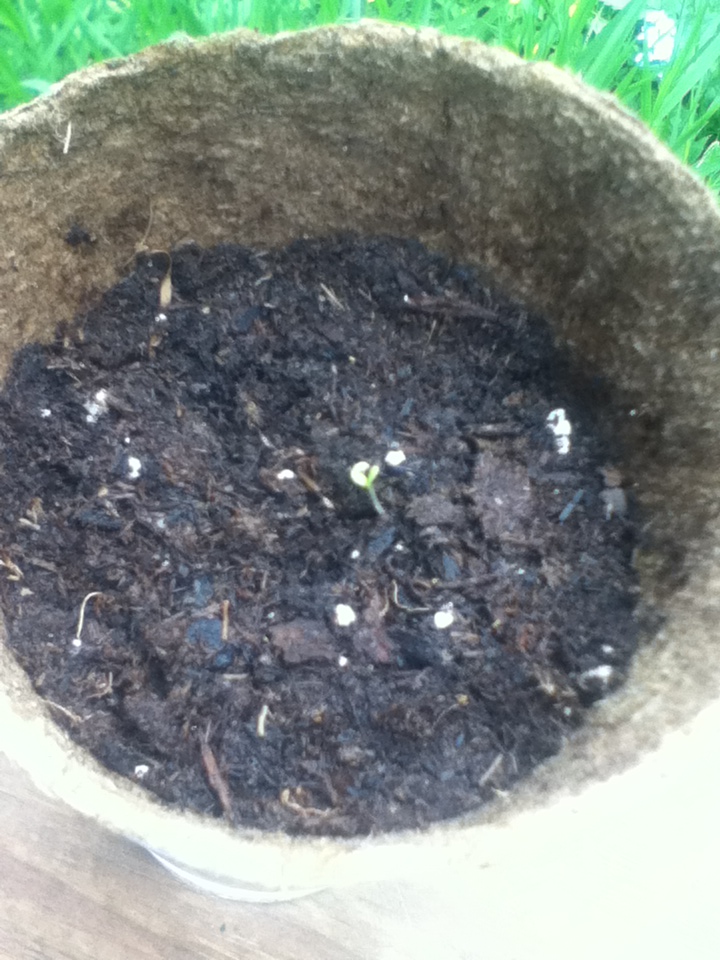 UPDATE: Dave was only able to salvage one
of the above seeds and transplant it. It
seems to be healthy and growing well. Dave
has it out in the sun right now. If you
look real close (it's a little right of
center), you can see the tiny leaves with
the seed covering still attached to it.
We'll put up a different picture when
there is something better to see.
UPDATE: Dave was only able to salvage one
of the above seeds and transplant it. It
seems to be healthy and growing well. Dave
has it out in the sun right now. If you
look real close (it's a little right of
center), you can see the tiny leaves with
the seed covering still attached to it.
We'll put up a different picture when
there is something better to see.
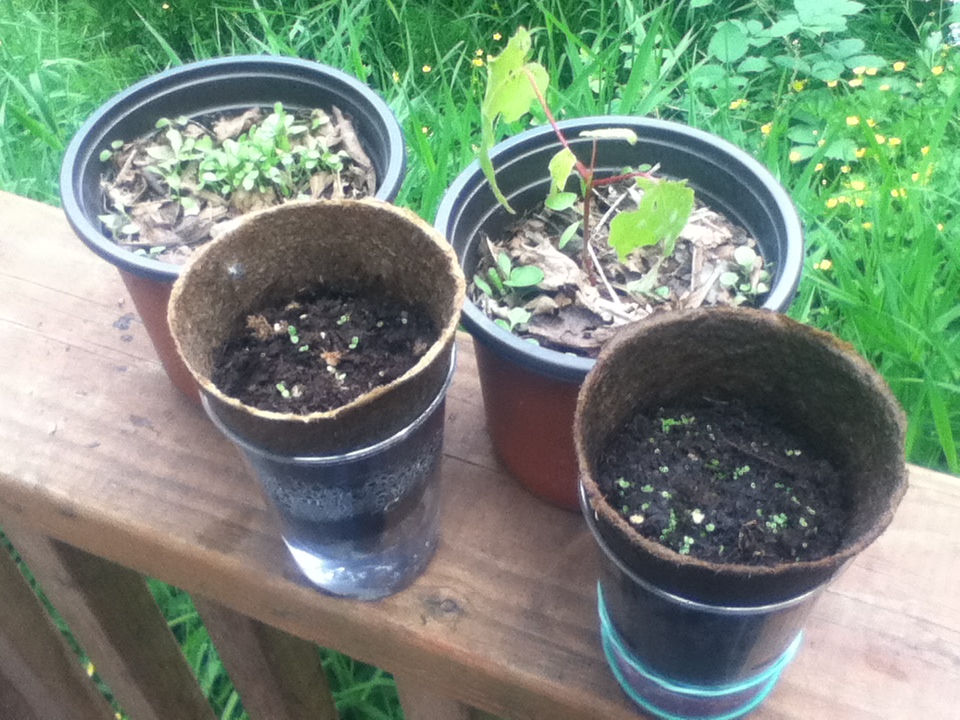
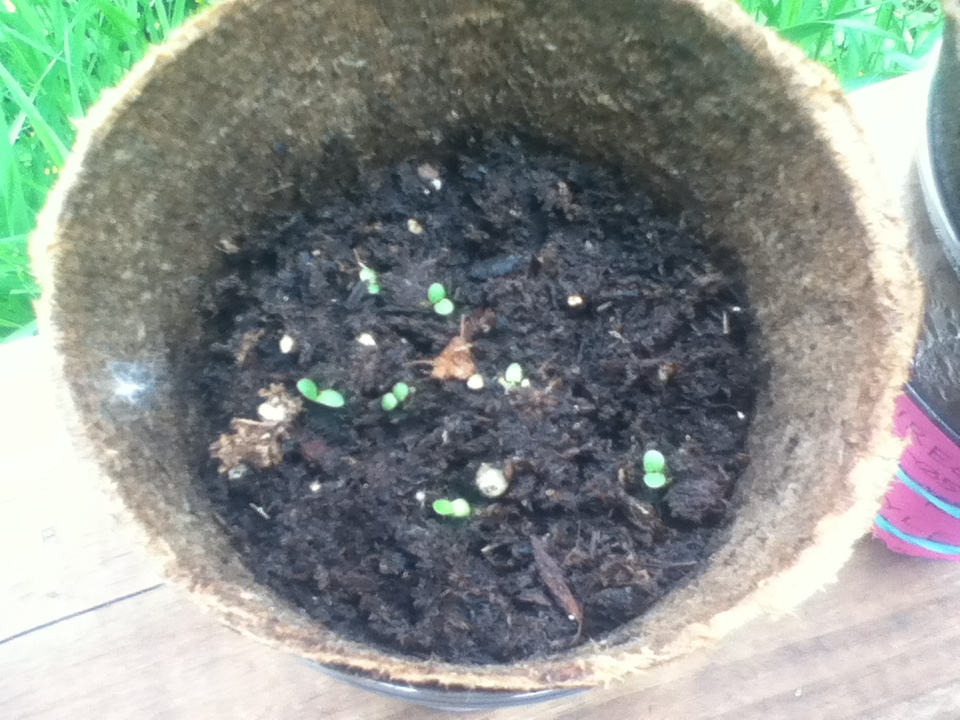 ANOTHER UPDATE: Dave found more
pussy willow seedlings and added them
to the above peat pot with the original
seed. You should be able to see them
better in this photo than the one above.
This photo was taken 14 days after the
original seed was started.
WHERE TO GROW
One of the important things to keep in mind after picking out a place
to grow indoors, are the lights and that their intensity decreases
(making it less effective) by one quarter for every square foot
distance away it is from its target (plant), or something like that.
It follows the inverse square law, which basicly states that change
is in inverse proportion to the square of the distance of the light.
What that means is that the closer to the light the plant is, the
better it will grow. Keeping it at least one foot away, obviously,
or the light will burn or rapidly remove water from the plant faster
than it can be replaced.
There are grow lights out there that are cool to the touch, so as far
as I know closeness isn't as important with these kind of lights,
but I'm not too sure how useful these lights really are for growing
good healthy plants. I guess it'll be time soon for a field trip to
a local nursery to find out what they have to say about all this.
Dave picked out a place that he's going to call his, "Mad Scientist Pot
Lab". I told him he needs to get some beakers, test tubes, bunsen
burners, and something that shoots out electric sparks. You know,
for atmosphere. He laughed, but I could see the wheels turning in
his head. Oh my GAWD!
ANOTHER UPDATE: Dave found more
pussy willow seedlings and added them
to the above peat pot with the original
seed. You should be able to see them
better in this photo than the one above.
This photo was taken 14 days after the
original seed was started.
WHERE TO GROW
One of the important things to keep in mind after picking out a place
to grow indoors, are the lights and that their intensity decreases
(making it less effective) by one quarter for every square foot
distance away it is from its target (plant), or something like that.
It follows the inverse square law, which basicly states that change
is in inverse proportion to the square of the distance of the light.
What that means is that the closer to the light the plant is, the
better it will grow. Keeping it at least one foot away, obviously,
or the light will burn or rapidly remove water from the plant faster
than it can be replaced.
There are grow lights out there that are cool to the touch, so as far
as I know closeness isn't as important with these kind of lights,
but I'm not too sure how useful these lights really are for growing
good healthy plants. I guess it'll be time soon for a field trip to
a local nursery to find out what they have to say about all this.
Dave picked out a place that he's going to call his, "Mad Scientist Pot
Lab". I told him he needs to get some beakers, test tubes, bunsen
burners, and something that shoots out electric sparks. You know,
for atmosphere. He laughed, but I could see the wheels turning in
his head. Oh my GAWD!
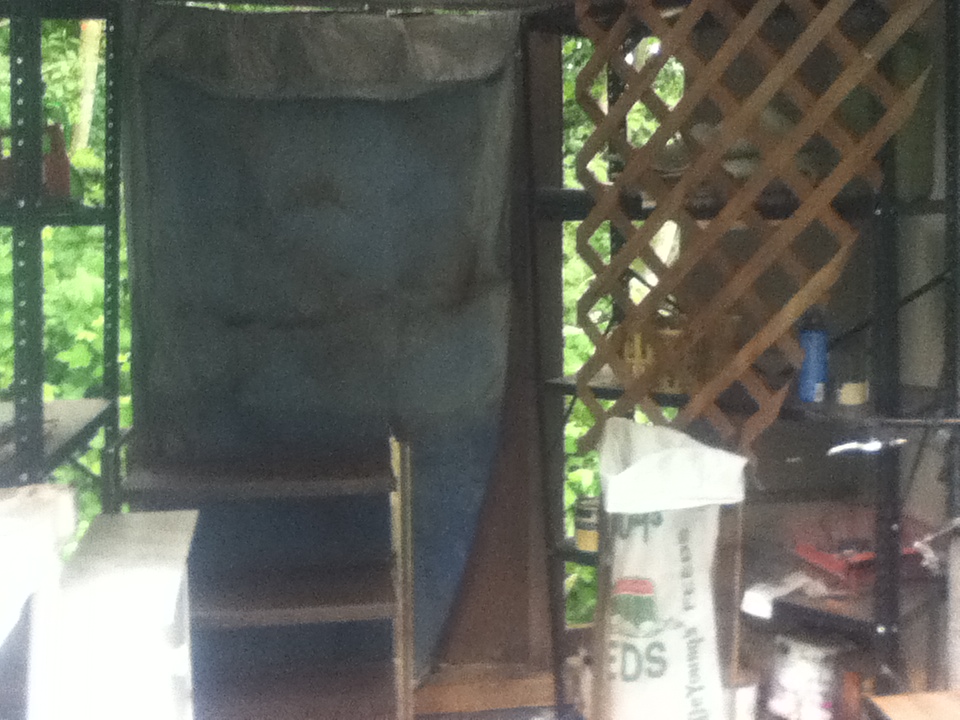 Notice the trellis on the right.
If you follow it down, you should
see a bag (bottom right) with the
big letters EDS printed across it.
He has that hanging from what I
think is a three-part folding
fireplace screen that he folded
together into a triangle. In this
he is hanging a big empty bag of
animal feed. He's going to cut
holes in the bottom for drainage
and place a few layers of
cheesecloth and then dirt, enough
for the roots to grow down at
least two feet, and the plants
themselves to grow up to about two
(or three) feet. He also has a
shelving unit set up (to hold the
carbon dioxide making bottles),
which also has crossbeams sticking
out from the top shelf that hold up
the trellis and is perfect for
hanging the lights. He has it all
figured out. Mad scientist indeed.
SHOPPING LIST
After finishing a quick reading of both the book and webpage, these are
the things Dave thinks he will need before he can start growing his
experimental pot:
soil
liquid fertilizer
paper towels
cotton
small dish
tweezers
timers
plant containers
charcoal
timer
fan
outdoor electrical cord
heater
thermometer
lights
green light bulb
ph test strips
humidity test strips
lumber (2x4)
paneling
screws
chicken wire
sealant
nails
TRANSPLANTING
Since Dave has decided to use peat pots and modify his pre-soaking
method so he is almost directly planting his seeds in the dirt, and
then just put the whole pot in the dirt, no transplanting shock for
the plants; since Dave is doing this, we won't be discussing too
much about how to transplant. Except to say that when transplanting
seeds after they have begun germinating, the MOST IMPORTANT thing
to remember is to be very careful not to damage the tiny roothairs.
And also, make sure the tiny seed leaves (cotyledon) are pointing
up and the root is pointing down. Obvious stuff, right?
TEMPERATURE
The optimum temperature for growing pot (and most plants too) is 25 °C
(78 °F), at least according to our book source.
The website Dave read says this:
SOURCE: http://en.wikipedia.org/wiki/Cannabis_cultivation
Notice the trellis on the right.
If you follow it down, you should
see a bag (bottom right) with the
big letters EDS printed across it.
He has that hanging from what I
think is a three-part folding
fireplace screen that he folded
together into a triangle. In this
he is hanging a big empty bag of
animal feed. He's going to cut
holes in the bottom for drainage
and place a few layers of
cheesecloth and then dirt, enough
for the roots to grow down at
least two feet, and the plants
themselves to grow up to about two
(or three) feet. He also has a
shelving unit set up (to hold the
carbon dioxide making bottles),
which also has crossbeams sticking
out from the top shelf that hold up
the trellis and is perfect for
hanging the lights. He has it all
figured out. Mad scientist indeed.
SHOPPING LIST
After finishing a quick reading of both the book and webpage, these are
the things Dave thinks he will need before he can start growing his
experimental pot:
soil
liquid fertilizer
paper towels
cotton
small dish
tweezers
timers
plant containers
charcoal
timer
fan
outdoor electrical cord
heater
thermometer
lights
green light bulb
ph test strips
humidity test strips
lumber (2x4)
paneling
screws
chicken wire
sealant
nails
TRANSPLANTING
Since Dave has decided to use peat pots and modify his pre-soaking
method so he is almost directly planting his seeds in the dirt, and
then just put the whole pot in the dirt, no transplanting shock for
the plants; since Dave is doing this, we won't be discussing too
much about how to transplant. Except to say that when transplanting
seeds after they have begun germinating, the MOST IMPORTANT thing
to remember is to be very careful not to damage the tiny roothairs.
And also, make sure the tiny seed leaves (cotyledon) are pointing
up and the root is pointing down. Obvious stuff, right?
TEMPERATURE
The optimum temperature for growing pot (and most plants too) is 25 °C
(78 °F), at least according to our book source.
The website Dave read says this:
SOURCE: http://en.wikipedia.org/wiki/Cannabis_cultivation
"The optimal day temperature range for cannabis is 24 to 30 °C
(75 to 86 °F). Temperatures above 31 °C and below 15.5 °C
seem to decrease THC potency and slow growth. At 13 °C the plant
undergoes a mild shock, though some strains withstand frost
temporarily. Frost occurs when air temperatures dip below 0 °C
(32 °F) and ice crystals form... "
NUTRITION (INCLUDING CO2)
If you like checking the pH of your soil, the balance looks to be
between 5.8 and 6.8. Here's a little chemistry about pH from
Wikipedia:
SOURCE: https://en.wikipedia.org/wiki/PH
"Pure water has a pH very close to 7 at 25 °C. Solutions
with a pH less than 7 are said to be acidic and solutions with a
pH greater than 7 are basic or alkaline.
[...]
"The exact meaning of the 'p' in 'pH' is disputed, but according
to the Carlsberg Foundation pH stands for 'power of hydrogen'... "
PRIMARY NUTRIENTS
The three major nutrients needed for good plant growth are represented
on most fertilizer bags (and other containers) as NPK (Nitrogen,
Phosphorus, and Potassium) and the numbers 00/00/00 represent the
amount of each ingedient included. The following is a list of
important mobile nutrients and for what they are needed. Mobile
merely means the nutrient is easily washed away and needs to be
replenished regularly. The letter in parenthesis is the scientific
notation for the chemical.
NITROGEN (N)
According to our book source, nitrogen is the most common
nutrient deficiency. This nutrient is mostly responsible for leaf
and stem growth, overall size, and healthy vigor. This sounds very
important for growing good pot.
PHOSPHORUS (P)
Also according to our book source, phosphorus is important for
photosynthesis, flowering and seed production. This too sounds very
important for growing good pot.
POTASSIUM (K)
And finally quoting directly from our book source, potassium
is, "necessary to make the protiens that augment the oil content and
improve the flavor in some vegetables and herbs." Dave reads that to
mean, it makes pot taste better. Certainly sounds like it
(especially the herb part), although he did agree that he was
ignoring the "some" in "some vegetables and herbs". "Even if I'm
wrong, it obviously won't hurt the plant," he added. I agree.
CO2 (Carbon Dioxide)
Equal in importance to the nutrients listed above is Carbon Dioxide:
SOURCE: https://en.wikipedia.org/wiki/Carbon_dioxide
"Carbon dioxide (chemical formula CO2) is a naturally occurring
chemical compound composed of two oxygen atoms covalently bonded
to a single carbon atom. It is a gas at standard temperature and
pressure and exists in Earth's atmosphere in this state, as a
trace gas at a concentration of 0.039 per cent by volume.
"As part of the carbon cycle, plants, algae, and cyanobacteria use
light energy to photosynthesize carbohydrate from carbon dioxide
and water, with oxygen produced as a waste product. However,
photosynthesis cannot occur in darkness and at night some carbon
dioxide is produced by plants during respiration. Carbon dioxide
is produced by combustion of coal or hydrocarbons, the
fermentation of sugars in beer and winemaking and by respiration
of all living organisms. It is exhaled in the breath of humans and
land animals. It is emitted from volcanoes, hot springs, geysers
and other places where the earth's crust is thin and is freed from
carbonate rocks by dissolution. CO2 is also found in lakes at
depth under the sea, and commingled with oil and gas deposits... "
Interesting stuff, in my opinion. I guess you just have to like
chemistry in order to appreciate it. But anyway, we make Carbon
Dioxide and plants take it and with light (through photosynthesis)
replenishes the air we breath which we turn back into Carbon
Dioxide. I personally think it's a kind of symbiotic relationship in
a way, even though Science doesn't technically consider it such.
While rereading the Wikipedia page up above, Dave noticed something that
gave him an idea:
SOURCE: https://en.wikipedia.org/wiki/Carbon_dioxide
"Yeast metabolizes sugar to produce carbon dioxide and ethanol,
also known as alcohol, in the production of wines, beers and other
spirits, but also in the production of bioethanol:
"C6H12O6 -> 2 CO2 + 2 C2H5OH... "
C: Carbon
H: Hydrogen
O: Oxygen
MAKING CO2
No matter how he describes it, whether it's a necessity, it helps bring
cost down, or whatever way he tries to word it; I know deep down
it's so he can make wine or beer to drink (editor's note: she's got
me pegged to the wall on that one). Regardless of all that, it
actually makes sense.
Since plants do need carbon dioxide, making your own (as a biproduct of
making alcohol) so you can always have more than enough for them,
really does just make sense and is also practical. For example,
if you like to drink, and Dave does or did anyway, there's the
obvious benefit of also having something to drink while you are
smoking your research, ha ha.
My only concern is that, well it's not really a concern so much as a
wonder as to what's next? Growing his own tobacco or coffee? I
wouldn't put it past him.
NUTRIENT TABLE
Included in the table below (in alphabetical order) are a list of most
of the nutrients needed for healthy plant growth, including the
primary (1), secondary (2), micro (M) and sub-micro (S) ones, and
also their scientific notation, whether they are mobile (wash away
easily) or immobile, and also the Parts Per Million (PPM) limits for
some of them. Primary and secondary nutrients are in red
(an *asterisk also precedes their names):
SCIENTIFIC MOBILE/IMMOBILE
NAME NOTATION (1) (2) (M) (S) LIMITS (PPM)
=================================================================
BORON B Immobile (M) 0.5 - 5.0
*CALCIUM Ca Immobile (2) 100 - 150
CHLORINE Cl Immobile (M) 200 - 1000
COBALT Co Immobile (M)
COPPER Cu Immobile (M) 0.1 - 0.5
FLOURIDE F Immobile (M)
FLOURINE (S)
IODINE (S)
IRON Fe Immobile (M) 2.0 - 10
MANGANESE Mn Immobile (M) 0.5 - 5.0
*MAGNESIUM Mg Mobile (2) 50 - 100
MOLYBDENUM Mb Immobile (M) 0.01 - 0.05
NICKEL Ni Immobile (M)
*NITROGEN N Mobile (1) 150 - 1000
*PHOSPHORUS P Mobile (1) 50 - 100
*POTASSIUM K Mobile (1) 100 - 400
RUBIDIUM (S)
SELENIUM (S)
SILICON Si Immobile (M)
SODIUM Na Immobile (M)
*SULFUR S Immobile (2) 200 - 1000
TELURIUM (S)
VANADIUM (S)
ZINC Zn Mobile (M) 0.5 - 1.0
FERTILIZING
The most important nutrients to replenish are the mobile ones listed
above, mostly because they wash away easily when the plant is
watered. One important thing to remember, is not to start
fertilizing the plant for at least two weeks after germination. I
think it's a good idea simply because it's easier to tell if you're
over or under fertilizing by the color and texture of the leaves,
plus the plant needs a good starting root base, by then it can stand
a little chemical abuse and neglect. You shouldn't neglect your
plants though, they depend on you for everything, unless you just
plant them in the ground outside, then they're on their own. But I
think they respond better when you care for them like they're one of
the family. Never hurts really.
Another important thing to remember is that it's a good idea to first
mix just a tiny little bit of the fertilizer in with the plant's
water first, to see how the plant reacts. As always though, don't
take our word for this. Do your own research and experimentation so
you can see for yourself, nothing wrong with that.
LIGHTING
The object of this section is to give you (and us) enough knowledge
so we all know what to look for when deciding which (grow) bulbs to
buy for indoor gardening, but we have to admit that this section was
the hardest section to research. Not because it's really difficult
to understand (intensity was a little confusing at first though),
and not because the light spectrum used by plants is difficult to
understand either, but because we have yet to find anything that
makes it easy to decide between one type of bulb and another based
on the light spectrum it emits.
There's tons of information in our book source about foot-candles, lux,
lumens, "PAR watts", and even CCTs and CRIs (More on all this a
little later); but there is nothing that combines all this
information together (except the kelvin color/ temperature scale)
so that when you go out to buy lighting, you have some kind of
rating system or color range information to make it easy to chose.
At least nothing that we've found yet anyway, but we're still
looking, at least I am anyway.
UPDATE: I just got back from checking out places that sell light
bulbs specifically, and after a quick look, I've found that one of
the product details for metal halide grow bulbs is the kelvin
temperature (color) of the bulb. This is fine as it goes, but it
doesn't tell us if it emits the other kelvin temperatures also. The
only thing I can assume at this point is that maybe that's as high a
color (or kelvin temperature) as it can emit. In other words, it
emits all the colors of the spectrum up to that color (or kelvin
temperature).
That must be what's going on here, because there are metal halide grow
bulbs that have a kelvin temperature (color) of 10,000 K. That's
far outside the light spectrum range that flowers need to grow. If
that was the only kelvin temperature (color) it emits, that would
put in the ultraviolet color (kelvin temperature) range and that
would make it practically useless for growing plants. Dave agrees
with me so until we can find out any different, we'll assume that's
what's going on.
One thing we did learn, which we'll discuss more in a bit, is that
the kelvin temperature (color) used by bulb manufacturers is the
kelvin temperature (color) where the bulb stabilizes. This doesn't
really tell us whether the assumption we just wrote about is true or
not, but it does at least explain how they come up with the kelvin
temperature for a bulb.
If that was all greek to you, hopefully you'll understand most of it
after reading the "Light Spectrum" section, coming up soon.
ANYWAY, the three basic things you need to know about light is what
exactly "light spectrum", "intensity", and "photoperiod" mean and
what they have to do with growing plants indoors, especially
marijuana.
Before we start, there is one thing you need to know, no matter
what kind of lights you use and especially if you are using only
one light source, and that is that you must be sure to spread the
light's "hot spots" (the point where the light is brightest and
hottest) so the plants aren't fighting each other over one "hot
spot". More on that little anger management issue later.
LIGHT SPECTRUM
From our book source:
SOURCE: "Gardening Indoors With Soil and Hydroponics"
"Plants need light to grow. The light must have the proper spectrum
and intensity to ensure rapid growth. Light is comprised of
separate bands of colors. Each color in the spectrum sends the
plant a separate signal. Each color in the spectrum promotes a
different type of growth."
LIGHT SPECTRUM GRAPH
Although the color, kelvin, and nanometer scales are approximate (and
in no way should be considered accurate, Dave is trying to combine
two different graphs from our book source into one graph), the graph
below is still good enough to give you a general idea what part of
the light spectrum the optimal growth zone is in (represented by the
light blue line) that plants use to help them grow, and also you can
see the part of the spectrum (roughly) that we can see (which is
represented by the black line).
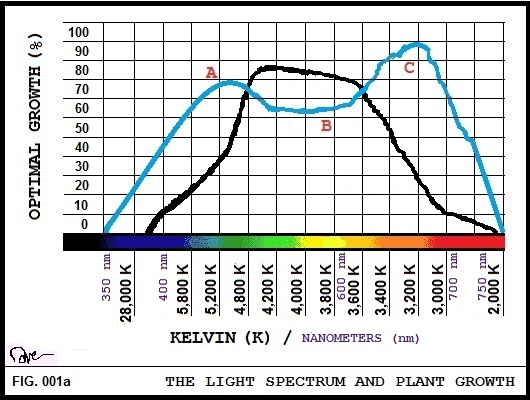 Points A, B, and C above are approximate points where the following
happens in plant growth:
A: Phototropic Response
B: Photosynthetic Response
C: Chlorophyll Synthesis
These are the three most important things for which plants use light.
Kelvin is the scale used to measure each color's temperature. It starts
at absolute zero:
O (Zero) K = -273.15 °C (-459.67 °F)
Nanometers (nm) are a measurement of light. One nanometer is equal
to 1 billionth of a meter (10-9). Light is measured in
wavelengths which are recorded as nanometers (billionths of a meter).
One wavelength is the distance between the beginning of a cycle to
the end. The cycle of one wavelength (also known as the signal) goes
from positive (or more positive) to negative (or more negative) and
back again. That's known as one cycle. Now imagine that you can
actually see the lightwaves going up and down, over and over again,
a billion times before they travel the length of one meter (1 meter =
3.28 feet). Amazing, huh? But the really amazing part is that you
actually do see this, at least your brain does, and interprets this
into a color. Now THAT's even more amazing.
The Photosynthetically Active Radiation (PAR) ZONE is the main
portion of the light spectrum that the plant actually uses. Most
scientist think it is between 400 and 700 nm (see the graph
above), but there are some scientist that think it is really between
350 and 750 nm and they use that scale accordingly.
The PAR ZONE is probably the most important thing to know about the
light spectrum, at least in relation to plant growth. The Zone can
also be expressed in kelvin also, roughly from 3,000 to 6,500 K.
"PAR watts" are important also, but we'll discuss that in greater
detail when we get to the section on Light "Intesity". All you need
to know right now is that "PAR watts" refers to the specific
amount of specific photons in a measured space (for example, a
square meter) that plants need to grow.
A PHOTON, basicly, is an elementary particle that acts both like a wave
and a particle at the same time. It is also responsible for the
phenomenon that we all call light. It's what allows us to see
and for plants to grow. We could get into a long discussion about
physics (specifically quantum mechanics and wave�particle duality),
but all you really need to know about photons is they are measured
in both nanometers (nm) and kelvin (K) as you can see in the graph
above; and also, like we just mentioned, in "PAR watts".
And if your interested in this kind of thing, from our book source:
SOURCE: "Gardening Indoors With Soil and Hydroponics"
Points A, B, and C above are approximate points where the following
happens in plant growth:
A: Phototropic Response
B: Photosynthetic Response
C: Chlorophyll Synthesis
These are the three most important things for which plants use light.
Kelvin is the scale used to measure each color's temperature. It starts
at absolute zero:
O (Zero) K = -273.15 °C (-459.67 °F)
Nanometers (nm) are a measurement of light. One nanometer is equal
to 1 billionth of a meter (10-9). Light is measured in
wavelengths which are recorded as nanometers (billionths of a meter).
One wavelength is the distance between the beginning of a cycle to
the end. The cycle of one wavelength (also known as the signal) goes
from positive (or more positive) to negative (or more negative) and
back again. That's known as one cycle. Now imagine that you can
actually see the lightwaves going up and down, over and over again,
a billion times before they travel the length of one meter (1 meter =
3.28 feet). Amazing, huh? But the really amazing part is that you
actually do see this, at least your brain does, and interprets this
into a color. Now THAT's even more amazing.
The Photosynthetically Active Radiation (PAR) ZONE is the main
portion of the light spectrum that the plant actually uses. Most
scientist think it is between 400 and 700 nm (see the graph
above), but there are some scientist that think it is really between
350 and 750 nm and they use that scale accordingly.
The PAR ZONE is probably the most important thing to know about the
light spectrum, at least in relation to plant growth. The Zone can
also be expressed in kelvin also, roughly from 3,000 to 6,500 K.
"PAR watts" are important also, but we'll discuss that in greater
detail when we get to the section on Light "Intesity". All you need
to know right now is that "PAR watts" refers to the specific
amount of specific photons in a measured space (for example, a
square meter) that plants need to grow.
A PHOTON, basicly, is an elementary particle that acts both like a wave
and a particle at the same time. It is also responsible for the
phenomenon that we all call light. It's what allows us to see
and for plants to grow. We could get into a long discussion about
physics (specifically quantum mechanics and wave�particle duality),
but all you really need to know about photons is they are measured
in both nanometers (nm) and kelvin (K) as you can see in the graph
above; and also, like we just mentioned, in "PAR watts".
And if your interested in this kind of thing, from our book source:
SOURCE: "Gardening Indoors With Soil and Hydroponics"
"'PAR watts' is the measure of the actual amount of specific
photons a plant needs to grow. Photons are a measure of light
energy. Light energy is radiated and assimilated in photons.
Photosynthesis is necessary for plants to grow and is activated
by the assimulation of photons. Blue photons are worth more PAR
watts than red photons, but scientist have difficulty measuring
the exact difference.
From what I understand, Dave doesn't care one way or the other, is that
bulbs are also given PAR ratings which I assume is a rating based on
how much of the right photons the light gives out. We're still
looking into this one.
Also, from our book source:
SOURCE: "Gardening Indoors With Soil and Hydroponics"
"Each color of light activates different plant functions. Positive
tropism, the plant's ability to orient leaves toward light, is
controlled by spectrum. Lightbulbs deliver only a part of the
necessary light plants need to grow. However, they deliver enough!
Most plants' light needs can be met by artificial means."
WHAT DO WE KNOW SO FAR?
Before we start discussing Light "Intesity", let's go over what we know
so far, and add a couple new things.
First, we know which part of the light spectrum that plants need to
grow. In nanometers (nm), it's from 400 to 700 (or 350 750 nm). In
kelvin (K) it's from 3,000 to 6,500 K, written (left to right) 6,500
to 3,000 K in the graph above. Using color, it's roughly from blue
to red.
The Kelvin (CCT) temperature/ color rating seems to be the one used the
most by grow bulb manufacturers. I've occasionally seen the CR Index
(CRI) used also. What's CCT, CRI mean you ask? Glad you asked.
The other two ratings that seem to be important also, are as
follows:
The Color Corrected Temperature (CCT) rating is the temperature (in
kelvin) the colors in the bulb become stable.
The Color Rendering Index (CRI) is used by companies to rate a bulb.
The higher the CRI (noon sunlight is rated at 100), the better the
bulb is for growing. Here is a CRI Table to help you make
comparisons:
SOURCE: "Gardening Indoors With Soil and Hydroponics"
CRI TABLE
BULB TEMP (K) CRI
==========================================
Warm White 300 K 52
Cool White 4,150 K 62
Lite White 4,150 K 62
Deluxe Daylight 8,500 K 84
Vitalight 5,500 K 96
Noon Sunlight 5,300 K 100
INTENSITY:
FOOT-CANDLES, LUX and LUMENS... OH MY!
As if nanometers and kelvins weren't confusing enough, the next thing
you need to know about light is intensity. Hold onto your britches,
this next part is going to be a hard ride, at first.
Practically all light is measured using either foot-candles, lux or
lumens.
Easy enough right? Ok, try this then, one foot-candle is the intesity
of light coming from one candle, measured at one foot away.
Got that? Ok, now try this one. One foot-candle is equal to 10.76 lux,
and one lux is equal to one lumen per square meter.
Is your head spinning yet? No, than try this one on for size. This
should clear everything up, hopefully.
The problem with foot-candle and lux is that they are mostly used in
measuring visible light, the light we can see. Plants use (see the
light spectrum graph above) a larger portion of the light spectrum
than humans can. Of the three mentioned above, lumens are probably
the most accurate measurement to use when comparing bulbs. From what
I understand, Dave seems to get this too, is that the more lumens
the better, and I've actually seen it mentioned along with kelvin in
the product details for both the metal halide and high pressure
sodium light bulbs, and thse seem to be the most popular bulbs also,
so there you go... and that's all we know, to paraphrase a funny
line we heard from an episode of "The Big Bang Theory". We think it
was called the "Fig Newton" episode?
WATTS
As far as we know, "PAR watts" and bulb wattage are two different
things. We'll be discussing the latter and with that in mind.
Next to kelvins and lumens, the wattage of a bulb is the next important
thing to know this is one area we can understand readily enough. The
most popular bulb watts favored by indoor growers is 400, 600,
1,000, or 1,100 watts, because they produce more lumens and have a
higher PAR rating than lower watt bulbs.
Before deciding what wattage of bulb to chose, let's go over the two
things we mentioned earlier about hot spots and distance.
If you are using single bulb lights, and not the florescent kind that
are over a foot long, you need to know is that where the bulb is
brightest and hottest, is called the bulb's "hot spot". If you are
growing just one plant, that's not much of a problem, but if you are
using one bulb (with one "hot spot") to grow three or more plants,
the plants will bend towards it and fight for dominance. Besides,
it's hard to get light all around the plant with only one "hot
spot". One of the best solutions is use more than one light, which
can be expensive if you use high wattage bulbs in the range of a
1,000 watts.
But, there is a cost cutting solution to this problem and it involves
that nasty little "d" word we mentioned earlier, distance.
Distance is the enemy of light and plants. The further away the plant
is from the light, the less light intensity, which translates into
less lumens per square meter, or something like that. It is based on
the inverse square law, that the intensity of the light changes in
inverse proportion to the square of the distance.
I = L/D2
I = Intensity
L = Light Output
D = Distance
What that means is if you start with a light output (intensity) of
1,000 (for arguements sake) and measure that intensity one meter
away from the source, you would end up with 1,000 because you are
dividing by the square of one (which is still one) and this keeps
the intensity still at 1,000.
But if you measure it at 2 meters away, you are not now dividing by 2,
but the square of two (which is 4) and the intensity decreases to
250. If you measure the intensity 3 meters away, you are now
dividing 1,000 by 9 (111.1) and so on. You can see how distance
can rapidly eat up light intensity.
Also, since higher wattage lights (for example, 1,000 watts) have to be
kept at least two feet away from the plants or they will literally
cook from the heat, lower wattage makes more sense. Not only because
you can put them closer the the plants (higher light intensity),
they also cost less to run. For example, two 400 watt light bulbs
(our choice, by the way) cost less to run than one 1,000 watt bulb
and you can not only put them closer to the plant, but also spread
out the "hot spot" better so the plants all aren't focusing on only
one source. It's a win, win situation all around, we think.
IN CONCLUSION (SO FAR ANYWAY)
This was all so confusing at first, but at least now it's a little
less confusing, compared to when we first started digging into
the lighting aspect of indoor gardening. Trying to remember and
organize it all into one understandable discussion was a big
task, but here we are, more organized than we were in the
beginning.
There should be enough information here so that anyone can make an
intelligent choice on which kind of light to buy, but before we
move on to one of the more interesting things about light and
plants (the photoperiod), let's go over what we now know. We now
know what nanometers and kelvin are and that kelvin (the color/
temperature scale) is one of the two most used measurements to rate
bulbs. The other one is lumens, and the more the better. The wattage
of the bulb is important also. The higher the watts the more lumens
produced. It also seems to us right now that the higher the lumens
produced, the higher the CRI rating is as a result. We'll have
to make sure about this one though, but it makes sense to us.
PHOTOPERIOD
This is basicly the period of time light is applied to plants within a
24 period. Sounds simple enough right? But for growing marijuana, it
is part of what Dave calls the "Sensimilla Trick".
The following is based on the assumption that the plant is a female. We
haven't researched yet how to tell the difference, but trust me,
Dave is already on top of this and we'll talk more about it when we
actually have some plants and pictures to show you.
One of the things that plants respond to in their lifecycle is the
shortening of the sunlight photoperiod. When the days get shorter,
many plants (including marijuana) begin the seed production process
which is to start flowering so they can make seeds. For marijuana,
this also signals maximum THC production, to protect
the flowers.
What this means is that after giving the plant enough time to grow
bushy (after one month the top is clipped to generate a shorter but
bushier plant), you induce flowering by cutting the light the plant
receives by significant amount of time (for example, from 16 to 12
hours of light in a 24 hour period).
We'll talk more about this in our next BLOG (BLG) entry.
WATER
Looks like we'll be getting to water in our next BLOG (BLG) entry also,
which doesn't look like it's going to happen for a couple more
months at least. It's a long story, but basicly the prep work is
going to take longer than we anticipated it would take. You'll see
what we mean in our next "Indoor Gardening" Blog. We'll link it from
here when it happens, and a link back to here from there, of course.
Or check out our yearly BLOG (BLG) compilation for 2013, every once
in a while:
http://www.amystrange.org/BLG-2013.html
Hope this all helped and that you'll join us again... soon.
APR <<<< 2013 >>>> JUN
LAST UPDATED: September 23, 2013
by myself and Caty.